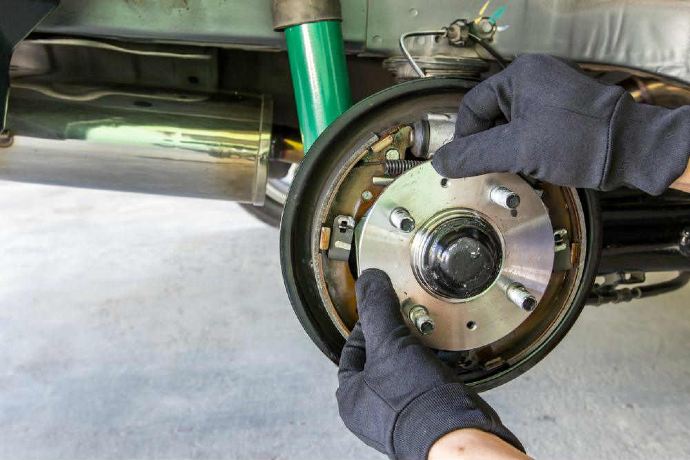
Modern-day internal combustion engines work by creating small explosions. This is thanks to the pistons which help increase the pressure inside the chamber where fuel and air are mixed together and a spark ignites them. This is the perfect combination for a controlled explosion that pushes the piston down. The reciprocating motion of that event is then transferred by the connection rod to the crankshaft and then to the wheel hubs. This, then, drives the vehicle’s wheels. Just like skateboards, wheel hubs have bearings that allow the wheels to turn a lot easier. The hubs are the most essential system of components that enable the motion from the engine to be used as efficiently as possible. The wheel hubs, or assemblies, are found between the wheel and suspension connecting the axle to the wheels. But sometimes, like every part in your car, they need to be replaced.
How to Replace Wheel Hub Assembly

What You Need
While the tools and supplies needed to replace a wheel hub can vary, the majority of them are usually the same. For the most part, you’ll need a brass hammer, pry bar, flashlight, a jack and jack stands, a combination wrench and an axle nut socket set to replace a wheel and hub assembly. But you might want to bring a ratchet, drive socket set, breaker bar, wheel socket set and disposable gloves too.
Step-by-Step
1. First things first, you should start by prepping the area where you’re going to replace the wheel hub assembly. Ensure that your vehicle is on a safe and level surface with the parking brake engaged. After that, loosen the lug nuts on the wheel that needs the hub assembly to be replaced. Use the breaker bar for this, together with an appropriate lug nut socket. The appropriate lug nut socket will be determined by the wheels of your car as not every vehicle comes with the same size wheels.
2. Once you have the lug nuts loosened, jack up your vehicle in the air and place jack stands to support it. Then, remove the lug nuts as well as the wheel/tyre, and continue by removing the axle nut, if there is one. Next, take off the brakes by disassembling them and removing the calliper bolts together with the bracket bolts.
3. After that, remove the rotor and if your vehicle has anti-lock brakes, disconnect all the wiring harness plugs. Then, loosen all the bolts that are left and keep on holding the wheel hub assembly onto its knuckle. With that done, just remove the hub assembly as one.
4. With the wheel and hub assembly now removed, install the new one together with the brake parts by doing everything in reverse. You first start by bolting in the new hub assembly to the knuckle and then connecting all the brake sensors on your vehicle. Next, torque the bolts to the correct setting and bring back the rotor in its place to reassemble the brakes.
5. After you’ve reassembled the brakes, you then need to install the brake bracket back to the knuckle and torque it. Afterwards, install the pads as well as the calliper onto the bracket and put back the axle nut.
6. Put the wheels back the same way you removed them and before you lower down your vehicle make sure the lug nuts are snug. This torque setting is specified in your vehicle’s manual as well as other torque settings regarding the hub assembly, which can also be found in the instruction manual provided by their manufacturer.
7. With your vehicle jacked back off the jack stands, lower your vehicle down and torque the wheels with a torque wrench so they don’t come off when driving. When you’re done with the replacement process, test drive your vehicle.
8. Before you start your car though, make sure to pump the brake pedal so you allow the pads to reseat to the rotor. While test driving, you shouldn’t experience any noise from the hub bearing and if that’s the case, then you’ve done everything right.

Conclusion
As we all know by now, the hub assembly is quite an important component you definitely want to keep in a good condition. But sometimes, this is just not the case and regalement is needed. What’s important when replacing your wheel hub assembly is to read the instruction manual provided by the manufacturer of the assembly and to be careful when taking things apart. Use the right tools and don’t rush things. Take your time and you will be able to do this yourself. In case some issues occur you can always bring your vehicle to a mechanic to check where you’ve gone wrong. Make sure you wear protective equipment and handle the parts with caution, especially if you have your vehicle lifted with a jack.


